Wheelbarrow Decorative Plant Cart project proves Spring has arrived!
It’s not just for Spring, though – fill it up with your favorite seasonal silk plants or flowers to enjoy year round. This charming wooden cart adds a nice decorative element to your deck, porch, entry foyer, or even as a centerpiece placed on a buffet or tabletop!
The overall dimensions of the Wheelbarrow Plant Cart project are about 8½” x 9 x 17½ “.
STEP 1 – Upload Project
Open the Designer software and open the included project file(s). You can then simply compile (upload) the project(s) to your memory card.
Handles_and_Supports.mpc

Side_Panels.mpc


After the project is compiled, select “Normal or Best” for the File Quality setting. Click “OK” to upload to your memory card.
NOTE: Carve times are as follows:
- Handles_and_Supports.mpc
- Best – 36 min
- Optimal – 42 min
- Side_Panels.mpc
- Best – 1 hr 50 min
- Optimal – 4 hr
- Wheel.mpc
- Best – 35 min
- Optimal – 1 hr 5 min
Take and insert the card into your machine and load the project board.
STEP 2 – Carving
You will see “Project Menu” on your LCD display. Press “1”, then scroll to the desired project and press the green ENTER button to select it. Then follow the prompts to carve the project.


Once the carving is finished, remove it from the machine and vacuum or blow off any excess sawdust.


STEP 3 – Separate Parts and Pre-Assembly
Separate the pieces from the board with a sharp chisel, utility knife, or hobby saw.

Glue the two wheel halves together and clamp until dry. Use a 5/8-inch dowel scrap to align while the glue sets. NOTE: Don’t glue the dowel in.


Check the fit of the wheel between the axle support arms and the two spacer block squares. The wheel should have a slight clearance between the “hubs” to be able to turn. Use a length of the ⅝” dowel to align
the parts and test the wheel action. Dowel diameters can vary – sand the diameter, if necessary, to allow the wheel to rotate.
Glue the axle support arms and square spacer blocks together. Clamp the parts until dry. TIP: Allow the round “hubs” to overhang your work surface to allow the arms to rest flat on the table while the glue sets.

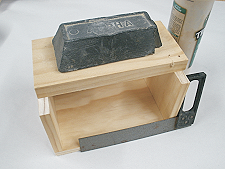
Cut and glue the three ½ ” thick panels together (the two short panels go ON TOP of the longer bottom panel).

Square-up and weigh down until dry.
STEP 4 – Main Assembly
Set the cart panel assembly on a scrap piece of 1/4-inch thick material to raise it up from the work surface. Glue the Side Panels to the cart panel assembly. Clamp until dry.


After the glue is cured, center and glue the axle arm assembly to the bottom of the cart container. Make certain the drilled holes for the handles are at the opposite end from the wheel end.

Depending upon your choice/method of finish, you may find it easiest to apply your finish now, before proceeding with the final assembly (unless you are leaving it natural as in the sample here).
After applying a finish (or not) you may proceed…
STEP 5 – Final Assembly
After the finish is dry, affix the handles with glue as well as gluing short lengths of 1/8-inch diameter dowels into the pre-drilled mounting holes. Trim and sand the dowels flush with the surface.

Install the wheel by feeding through a four-inch length of the 5/8-inch diameter dowel through the axle hubs. You can glue one end of the axle to secure it (and avoid gluing the wheel by mistake), or you can follow the steps below and drill a couple holes in the axle using two 1/8-inch dowels as “cotter pins” glued in place.
Drill holes with a drill press and “v” jig
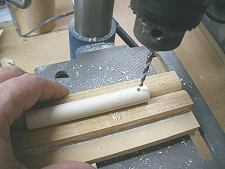
Glue the “cotter pins” in place.


FINAL
I hope you enjoyed making your Wheelbarrow Decorative Plant Cart!
Happy Carving!

