
Spring is just around the corner, and here is a ‘just-in-time’ project for your backyard feathered friends’ nesting season!
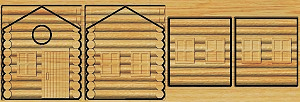
The Hunter’s Cabin Birdhouse features a log cabin style complete with a gently curved ‘shingle’ roof, plus a simple nail-hinged side panel for easy cleaning. The crooked wooden stovepipe chimney is an optional item you can create from scrap dowels to add an additional touch of charm to this rustic cabin birdhouse.
The overall finished dimensions of the assembled Hunter’s Cabin Birdhouse are about 7″ wide x 9 ” tall x 10″ long.
ITEMS YOU WILL NEED
- Boards with the following dimensions:
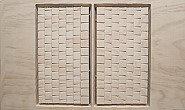
- Birdhouse Panels
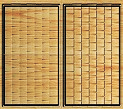
- Shingled Roof 0.75″ x 11″ x 20″
- Bottom approx. 5.5 ” x 5.5 ” (not an MPC)
- NOTE: Do not use boards that are shorter in length than specified above.
- 1¼” 3d finish nails, one 1″ #6 brass screw, scrap lengths of 1 1/4″, 5/8″, and 1/8” wooden dowels, four popsicle sticks
- Wood glue, sandpaper, wood putty, stain and/or paint and clear finish, table saw to cut roof miter joint, drill and bits, belt sander to form stovepipe cone
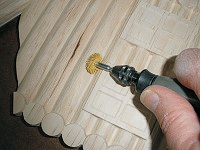
- A Dremel-type rotary tool with assorted sanding wheels and bits to sand small details and speed up preparation for finishing.
STEP 1 – Upload Project
Open the Designer software and open the included project file(s). You can then simply compile (upload) the project(s) to your memory card.
After the project is compiled, select “Normal or Best” for the File Quality setting. Click “OK” to upload to your memory card.
NOTE: Carve times are as follows:
- Cabin_Birdhouse_Panels.mpc
- Good – 4 hours 45 min.
- Best – 10 hours
- Shingled_Roof.mpc
- Good – 2 hours 45 mins
- Best – 5 hours 45 mins
Take and insert the card into your machine and load the project board. Turn your machine on and proceed with Step 2…
STEP 2 – Carving
At the machine, follow the prompts to carve the project.
Once the carving is finished, remove it from the machine and vacuum or blow off any excess sawdust.

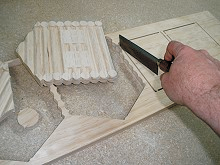
STEP 3 – Separate Parts from Material
Separate all the pieces from the boards with a utility knife or hobby saw. Use a Dremel-type tool to sand off the tabs and sand all the components to remove any fuzzies and undesirable tool marks.
Cut a 30° miter at the top edge of each roof half, using your table saw (save the miter scraps).

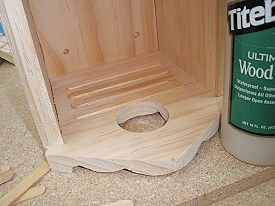
Cut out the bottom piece to fit inside the four panels. It will be approximately from scrap wood 5.5 ” x 5.5 “, but you may want to tape the four panels together to trace the inside dimensions on the board for an exact fit.
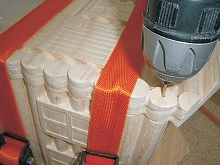
Drill four ¼” drainage holes near the corners of the bottom piece.

Glue the front, back, bottom and ONE side together. Do NOT glue one of the sides. The unattached side will become the hinged access door. You can use it as a spacer when clamping the box together while the glue dries.

Glue roof halves together. Use masking tape to hold together the cabin assembly until dry. I also glued the miter scraps (cut to just shy of 5.5 long and centered inside the roof miter crevice) to reinforce the joint and provide a convenient positioning reference for the roof to be attached later.


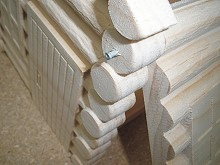
After allowing glue to dry overnight, remove the roof assembly but leave the clamps on the cabin structure. Mark the center of the “top logs” front and back where the unglued side panel meets the front and back panels.
Drill small holes slightly less than your finish nail diameter, but a little deeper than the nails are long at these marks. This forms your nail hinge pivot. Insert two finish nails part way, remove your clamps, then test the hinge action. You may need to remove the nails and sand the sides of the side panel slightly so it swings open and closed easily. When satisfied, re-nail and countersink, then fill with wood putty.
Glue four popsicle sticks inside the front panel under the entrance hole. Space them apart the width of each stick. This provides a “ladder” for baby birds to easily exit the nest when the time comes.
STEP 4 – Finishing
Apply stain/paint and clearcoat of your choice to the exterior only before final assembly. Avoid applying any finishing materials on the inside. This is according to
information I found regarding birdhouse building. Apparently, most finishes are toxic to birds. It might be alright to use a “food-safe” clear finish on the interior. However, I did not try that myself and I left the inside completely unfinished. Here’s what I used on my Hunter’s Cabin Birdhouse made from Select Pine:
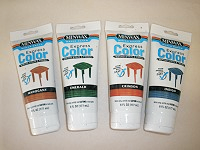
- Minwax Express Color water-based Emerald (tube) on roof
- Minwax Vermont Maple water-based stain (can) on cabin
- Minwax Dark Walnut #2716 on “stovepipe”
- Several coats of Krylon Crystal Clear Acrylic spray
STEP 5 – Final Assembly
Drill a countersunk hole in the bottom center of the swinging side panel and insert the brass screw.

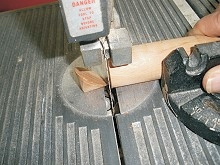
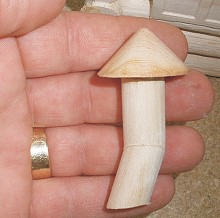
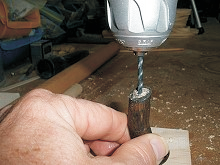
Glue and nail the roof assembly to the cabin assembly. If you wish, you can fashion a “stovepipe chimney” using scrap dowels to add to your cabin roof. I made a chimney cone by rotating a 1¼” diameter dowel against my belt sander to form the cone shape. I clamped a miter gauge set at 45° to the sanding belt table to get a more accurate result. Then I cut off the cone from the dowel using my bandsaw (you could use a fine-toothed hobby saw instead). An alternative is to simply carve a cone from a chunk of basswood available from any craft store, or even make a metal one from some scrap tin roof flashing or copper sheeting!
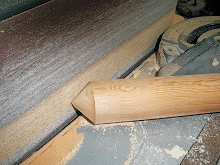
I made the stovepipe from scrap 5/8″ diameter dowel. I cut a short length in the middle and one end at a random angle, then glued the pieces back together, rotating them slightly offset from each other to yield the “crooked” pipe effect. Then I glued the
cone on top of the assembly.
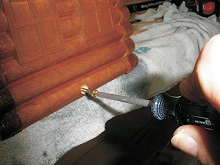
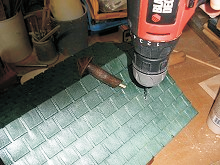
Drill a 1/8″ diameter hole in the base of the stovepipe then glue a short length of 1/8″ dowel into the hole.

Drill a 1/8″ diameter hole (not all the way through) in the roof at the desired location, then glue the stovepipe in place.
FINAL
This completes the construction of your birdhouse. The type of birds you want to attract in your area will determine where and how you need to mount your birdhouse. Many “birders” recommend mounting birdhouses on poles rather than hanging from tree branches. Pole mounted bird houses generally offer more protection from predators and prevent the birdhouse from swinging on windy days, although some kinds of birds don’t mind that too much (wrens).
You may change the size of the entrance hole to suit a particular bird species before carving the project. It is preset at 1½.
In the Designer software, you will notice a small divot marking the center of where the hole is to be located on the Cabin_Birdhouse_Panels.mpc. After resizing the existing hole, you can use the divot as a guide to relocate the new hole by zooming in a little as you move it into position.
Happy Carving!


Appendix
Birdhouse Mounting
Attach screw eyes through the roof, near the peak and attach chains to the screw eyes to hang the birdhouse, or you can mount the birdhouse on a garden post with the bottom of the post buried at least 18 inches into the ground with 5 to 10 feet extending above ground. Another option is to build a wooden “L” shaped fixture which can be fastened to a vertical surface such as a tree trunk or wall, then affix the birdhouse to the platform with screws driven from the bottom of the platform shelf into the bottom of the house. Choose screw lengths so the sharp points don’t protrude into the inside of the birdhouse itself. A metal shelf bracket or two may serve the same purpose for this type of mounting.
Other Misc. Recommendations from the Extension Service of Oregon State University…
- Face the entrance hole to the north or east to prevent the birds from overheating if summers are hot in your area.
- Put no more than one house per tree for the same species of bird.
- Don’t put bird houses near bird feeders.
- Houses on metal poles are less vulnerable to predators.
- Use no more than four nest boxes per acre for any one species of small bird such as wrens or chickadees.
- Use no more than one house per acre for any one kind of larger bird such as robins.
For specific information on the types of nest boxes and shelves different bird species will utilize, Oregon Department of Fisheries and Wildlife (ODFW) offers free brochures about building houses for many species of birds. For a list of available brochures, write: ODFW Information and Education Office, P.O. Box 59, 2501 SW
First Ave., Portland, OR 97201. Also, you may want to check for books on bird houses at the local public library,
contact your local Audubon group, or the county office of your local Extension Service for more information.
Birdhouse Building Material Choices
Several birdhouse building websites recommend Cedar, Redwood or Pine as ideal birdhouse building material. Most recommend avoiding exterior (treated) plywood, pressure treated wood and plastic material due to possible toxicity to birds.
Although a lot of websites mention that Cedar or Redwood are good choices for birdhouses, I found at least one website that said woods with a natural resistance to decay and insects (like Cedar and Redwood) contain natural chemicals that can actually be harmful to some bird species and recommend Pine as the better choice! I can’t knowledgeably advise which one is really ‘best’, but I built mine from Pine.
Additional Materials Resources
www.mcmaster.com or www.amazon.com
- 3M Radial Bristle Discs from (stack 3 discs at a time on your rotary tool mandrel)
- 80-grit: part # 4494A19
- 220-grit: part # 4494A18

Home Depot or Lowe’s
- Minwax Water-based Express Color Wiping Stains (6 oz. tubes)
- Emerald color was used for this project
- Minwax Water-based Wood Stain (pint can)
- Vermont Maple
- Select Pine boards
- Disposable Brushes and Paint Rags