This tutorial is originally from Michael Tyler’s (carvebuddy.com) 2014 CarveWright Conference presentation. He wowed us with this fun technique and supplied a how-to tutorial for all the attendees. It has since become one of the most popular uses of the CarveWright Rotary Jig. Michael will be back again at this year’s Conference in June, so get signed up to see what new he’s got in store for us. I recently had a need for making a version of this and thought I’d share my project along with Michael’s instructions.
Rotary Lithophanes
A Tutorial by CarveBuddy.com
The CarveWright Rotary Jig can be used to create unique lithophanes using common PVC plumbing pipe. The results are impressive! Now you can create unique lithophanes that most people have never seen before.
Step 1 – Design Your Project
Create a New Rotary Project in your Project Designer PRO.
- Set the Board size to 11.875 inches long
- Set the Diameter and Part-off to 3.5 inches

Then, import the photo or image you wish to carve and save it into you Pattern Library.

Next, place that imported pattern on the board. Set the depth to .170 and height to 999 and set Bit Optimization: BEST.

I decided to soften the edges by adding a feathered 0.170” deep Carve Region and place the photo within it. This required making the PTN an Additive Merge and assign Clip Carving Inclusive to achieve the effect.

Last, save the Project and upload it to your Memory Card. I uploaded this project at BEST quality setting, but others have done it at normal and the quality is nearly indistinguishable.

STEP 2 – Prepare Your Materials
Materials List:
- 3 and 4-inch PVC Pipe (INSIDE diameter)
- 3-inch to 4-inch Pipe Coupler/Adapter
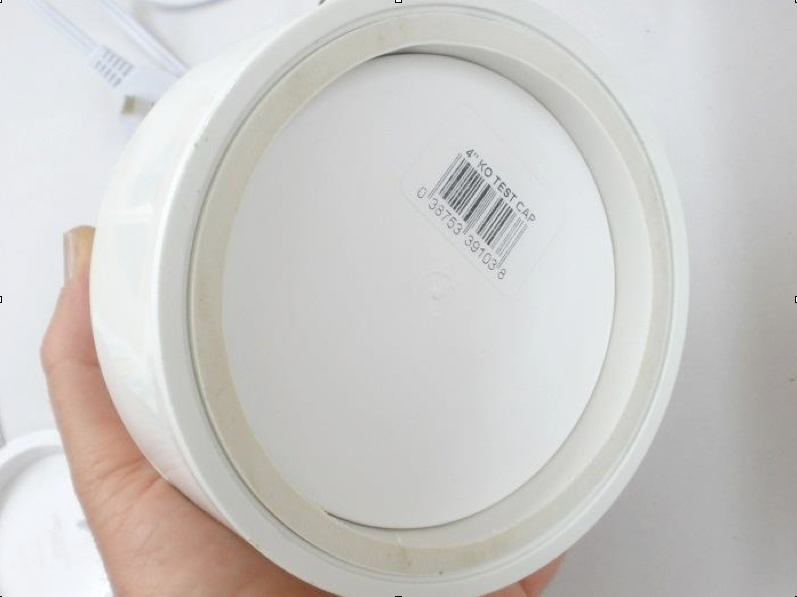
- One 4-inch Test Cap
- Two 3 inch Drain Caps (for pipe ends while carving)
- One 3 inch Drain Cap (for top vent)
- Scrap wood and screws (for gear end mounting)
- LED puck light, Velcro, aluminum duct tape, metal tack

Cut a length of 3-inch pipe to 12-inches long. I used a band saw to cut the pipe. The blue tape is to secure the pipe to my miter gauge so it didn’t move or rotate while cutting.

Cut a 7/8-inch ring from the 4-inch pipe. Again, I used the band saw to cut the pipe.

Sand off the lettering at the ends with 400-grit sandpaper. I used wet/dry sandpaper and water to sand off the lettering.

Cut a piece of wood from ¾-inch scrap. Hot glue the wood inside one of the drain caps. Clamp until set. The drain caps from Home Depot have a circle dead-center in the cap. Perfect for use with the rotary jig!

Insert two drain caps into the ends of the 3-inch pipe. The fit should be tight. Drill a 7/32-inch pilot hole in the wood for the jig screw.

Install the pipe into the rotary jig. Drive two screws into the wood block end. You may want to pre-drill small pilot holes in the wood block end for the two screws.

TIP: Wipe the pipe with a dryer sheet to reduce static cling, then insert the jig into your CarveWright machine.

STEP 3 – Carve Your Project
You’ll need to run the Rotary Calibration routine as you do before any rotary project.
SEE ROTARY SET UP VIDEO for further instruction
Once calibrated, position the pipe so any of the remaining printing will be carved away during the project run. For this project I used the regular 1/16″ carving bit, but the project could be run with a 1/32″ carving bit for even more detailed photos.
You will set the project diameter to 3.5-inches. This is the OUTSIDE diameter of the “3-inch” pipe.

After the carving is finished, remove the pipe from the jig, remove the end caps, and brush off any clinging plastic with a stiff nylon brush. (Don’t use metal brushes!)

STEP 3 – Build The Base
Press the Test Cap into the ring. Slide the ring assembly into the bottom of the coupler. The fit should be snug. Secure from the inside with aluminum duct tape, if necessary.


Make a hole for the A/C cord of the LED puck light. Drill a tiny hole for the metal tack (if using a touch-type dimmer light). If using a corded line-switch light, the metal tack won’t be used.

Prepare the LED puck light for mounting. I used a touch-light from Lowes. It toggles High, Low and Off when the touch pad is activated.
NOTE: If using a plain corded line-switch light, simply use Velcro to secure the puck light inside the base and you’re done.

Create a touch ‘conducting strip’ of metal by folding a length of aluminum duct tape along the length. Tape the strip to the touch pad. Insert the tack on the other end.
Plug in the A/C cord. Test by touching the metal tack. It should toggle the light to high, low, and off.

Insert the A/C cord into the base and place the Puck Light assembly into the base and route the metal conductor strip to the tack hole. Insert the tack from the outside, then secure the conductor strip end to the tack shaft with more metal tape on the inside.
Secure the light with Velcro to the base interior.

STEP 4 – Final Assembly
Insert your lithophane into the base. Place a drain cap into the top of the tube.

Turn it on and enjoy!

Great tutorial Michael! See more from Michael at carvebuddy.com.
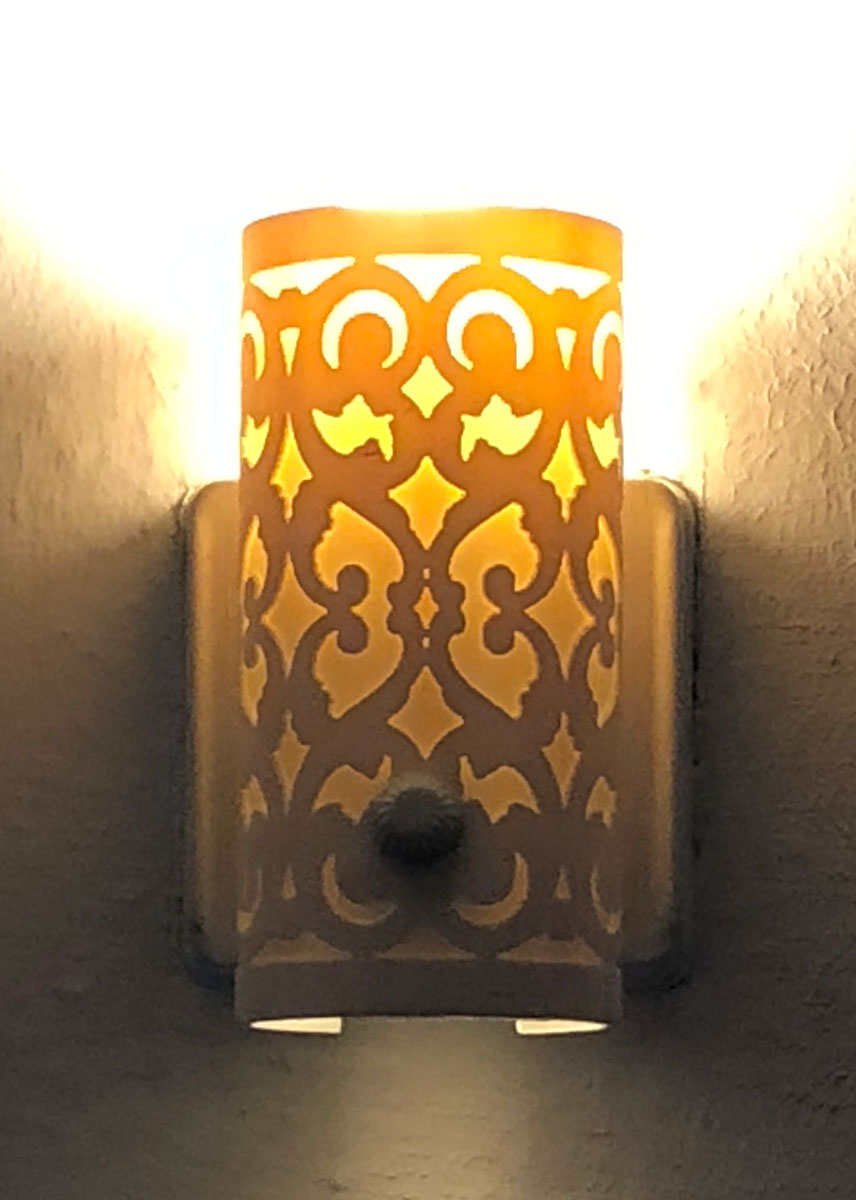
Lamp Shade
So, what did I make with this tutorial? I needed to replace a glass diffuser for an ancient wall sconce light fixture. I looked and looked to find something I could buy, but they don’t seem to exist anymore. That’s where this tutorial came to mind. I could carve one!
I used patterns from the basic library and the mirroring tool to make myself a nice decorative pattern.

DOWNLOAD MY PROJECT FILE HERE

I cut the shade down using the bandsaw and sliced off the back to fit the light fixture. Then I drilled a hole for the mounting screw.


Come checkout Michael and all the other speakers at the 2018 CarveWright Conference.
