Carving T-shirts and Christmas Cards?
Yes, It’s true, I made t-shirts and Christmas cards with the CarveWright! I used an old process called block printing. It’s been around forever, and many of you have probably even done it before. Traditionally, one would trace an image onto a block of some sort, carve away (by hand) the negative space to create a positive of the design, then roll ink onto the design and press it onto a piece of paper. Well, I did exactly that, except my CarveWright handled the carving.
First things first: Supplies
The first thing I did was head down to the art supply store to see what they had available for block printing. They had basically 2 types of material for carving designs into. Linoleum Blocks of various sizes, and a rubbery material called speedy cut. I picked up one of each for testing.

I had also learned online, that it’s pretty easy (and really inexpensive) to make your own linoleum blocks. All you need is a linoleum flooring tile ($.68 HomeDepot) and some MDF to glue it too.

Next, I needed to design what I wanted to print, and jig these materials for carving, and run some test.
I imported some simple one color graphics, and arranged them on boards matching my test pieces.

First, I tried the two materials I bought from the art store. Neither of them did very well. The pink stuff just didn’t work at all. That I kind of expected, but the linoleum block didn’t do as well as I had hoped either. It carved the design just fine, but it left fuzzy edges that would definitely interfere with the print.
They fuzzy edges were pretty easy to clean up with an exact-o knife, but the point of this was to not do it by hand!

So, on to the linoleum flooring. First, I’ll need to prepare it. I cut a piece of MDF down to 12″x12″ to match the tile size. Then, I used 3M’s Super 77 spray adhesive on both sides and pressed them together.
Next, I built the jig, with more MDF to give me my 3.5″ on either side of my tile. I used more of the tile material to make everything a nice level surface.
It’s ready to go, so lets see how this stuff works.

This carved really well actually. The lines are crisp and distinctive for the most part. I learned a couple lessons with this carve. The spaceman and the CarveWright machine badge used “bit optimization” on “best” and the “small draft” and they were perfect. The horse didn’t have any bit optimization and the lines were too thin to be any good for printing. So, remember this: BIT OPTIMIZATION ON BEST AND A SMALL DRAFT. Also, again, flip your designs so the print comes out facing the right direction. That CarveWright logo badge is going to print backwards, oops.
Now, lets do some printing! I bought a few other supplies and some different inks to try out as well. The first thing you will need is a brayer, which is just a fancy word for a rubber roller.


I tried several inks from screen printing inks, to water and oil based block printing inks.
They all worked pretty good, however, the screen printing inks needed to be applied pretty thick to transfer to paper well. After a couple test prints, I started to make some shirts. The process is very simple. Roll the ink out on a surface (I used a piece of glass) to coat the roller, then roll the ink onto the block.

Next, line up where you want the print to be and press the block down.

Then carefully lift it up and you have your print.
Then do it again, for as many shirts as you want.
This is fun! Lets make some more.
Wow, so this works really well, it’s very inexpensive, and it’s really easy to do! What should we make next. Since Christmas is coming up, and many of you are spending a lot of time with your CarveWright’s preparing gifts, centerpieces, and all kinds of other things, how about adding Christmas cards to the list of things you can make this holiday season with your CarveWright.

[button type=”ambitious_button” url=”https://www.carvewright.com/assets/downloads/ChistmasCard_stamp.mpc” target=”” ]DOWNLOAD THIS DESIGN [/button]
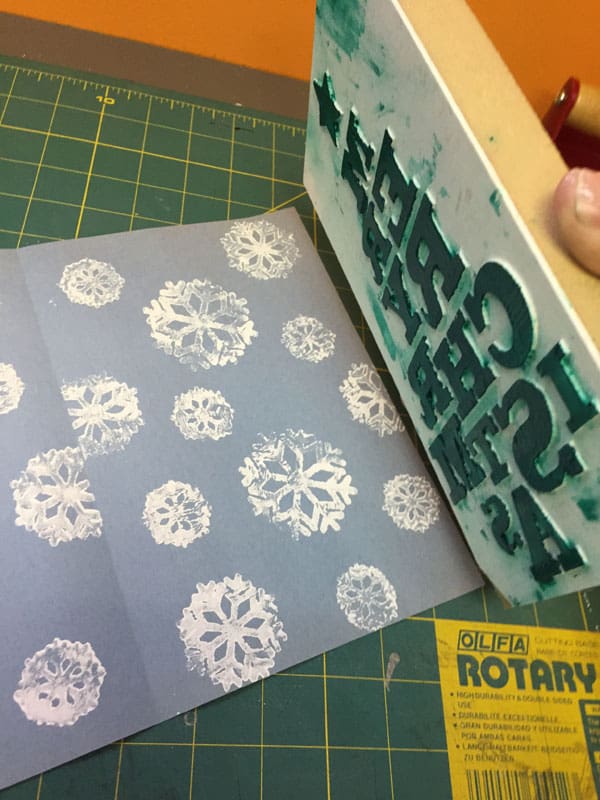
My idea is to do a 2 color layered print. I got some blue colored paper and printed the snowflakes in white first.
Then, I printed the tree design in green on top of it.
The prints come out with some slight variations that give it a really nice hand made look.
Not bad for $.68 and a 30 minute carve!
Happy carving, happy printing, and happy holidays!


