
A couple years ago, we had a special visitor at our conference. She didn’t own a CarveWright machine, and had actually just learned of it’s existence. Her name is Bridgette Mongeon, and she was researching the system for her new book. Now 2 years later, her book, 3D Technology in Fine Art and Craft: Exploring 3D Printing, Scanning, Sculpting and Milling, is available for pre-order from Amazon. The book is an in-depth look at how 3D technology is playing an ever increasing role as an art medium, especially with the ability to physically create 3D designs with technology like the CarveWright. Bridgette, along with being an author, is an accomplished sculptor with work all over the country. Find our more about her on her website: creativesculpture.com.
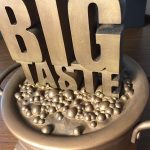
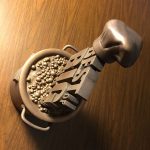
I’ve kept in contact with Bridgette since our initial meeting at the conference, and recently, she asked if I could help her with a project she had been asked to do for the local Big Brothers Big Sisters chapter. They have an annual fundraising event called “The Big Taste of Houston“, where chefs will compete for the BEST OF BIG TASTE TROPHY. That’s where I come in. They needed a trophy.
Bridgette’s daughter, Christina Sizemore of Diliberto Photo and Design, had already created a design and we discussed how to proceed making this thing.

The design looked good, and wouldn’t be too challenging to build, so we decided I would create the letters and she would create the rest of the 3D models.
The letters was pretty simple. With adobe illustrator, I have a lot of control over manipulating text, so I created the letters and exported them as a PNG file. Then I imported that PNG into Pattern Sculptor. In Pattern Sculptor, I was able to lower the background out, raise the letters up to get them to the thickness I needed, and export them as STL files to send to Bridgette.

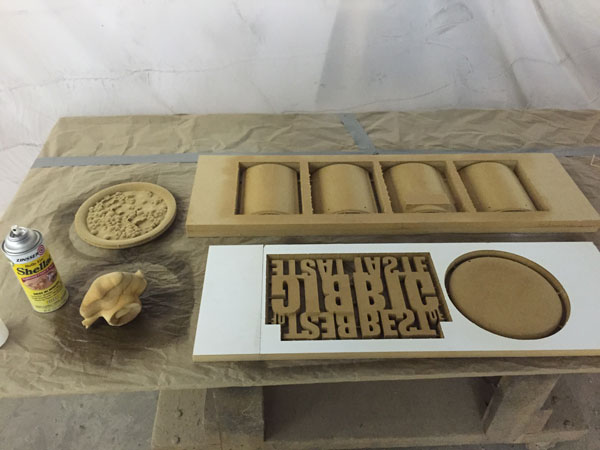
Soon after I sent the letters, she sent me the STL models of the entire trophy, and as we had discussed, sent me separated files of the pot, hat, and bubbles.
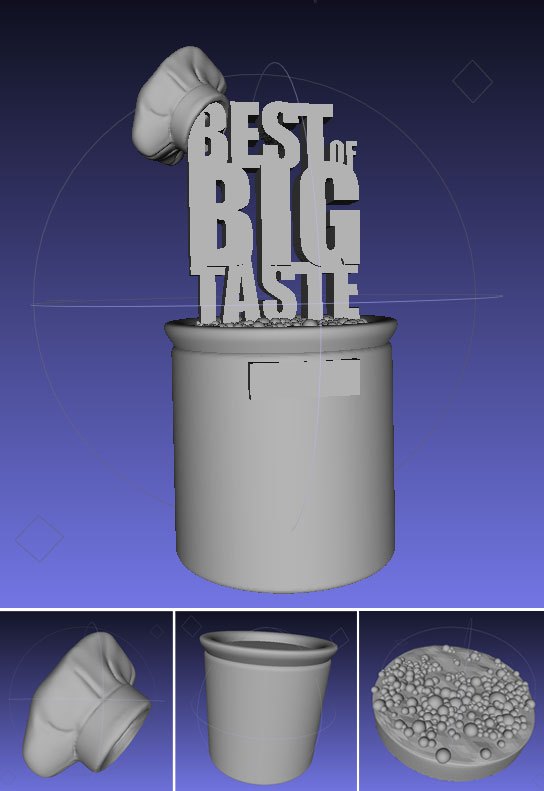
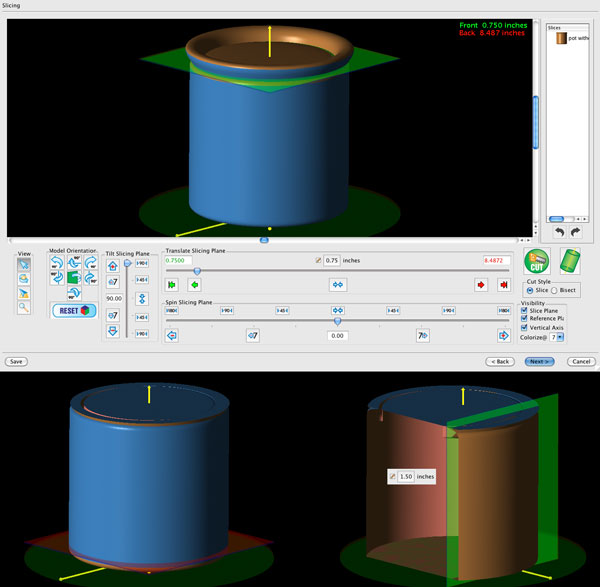
The next step is to get these into the STL Importer software to slice them up and prepare them for carving. I started with the pot. Even though the pot is round, its easiest to treat it like a box. I sliced the top and bottom off at 3/4″ depth, and then sliced the sides of it at 1.5″ depth, resulting in a 4 sided box with base and lid. I exported both sides of the lid by selecting “double sided” in the export window, so I could get the curve on the bottom and the top.
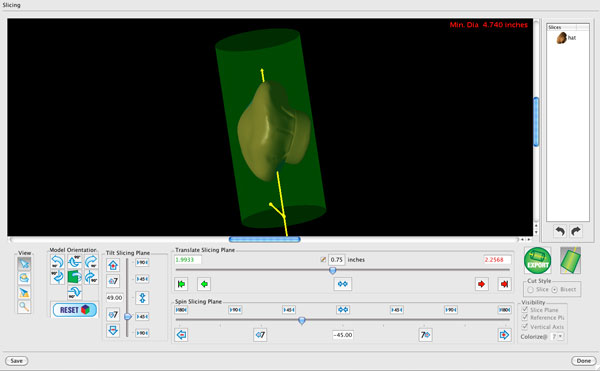
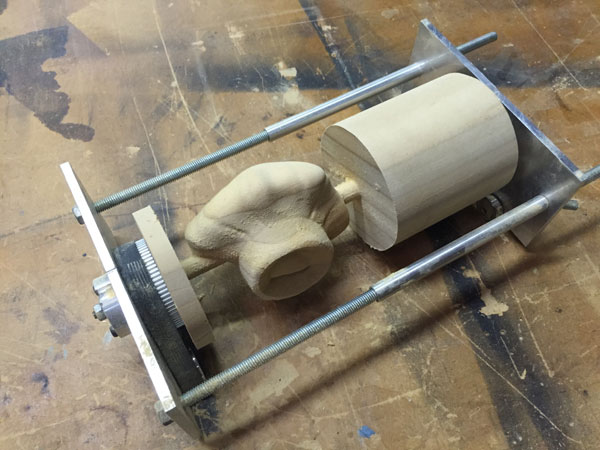
Next, I imported the chef hat. With the rotary software, I am able to use the STL Importer in rotary mode, and position the hat within a cylinder.
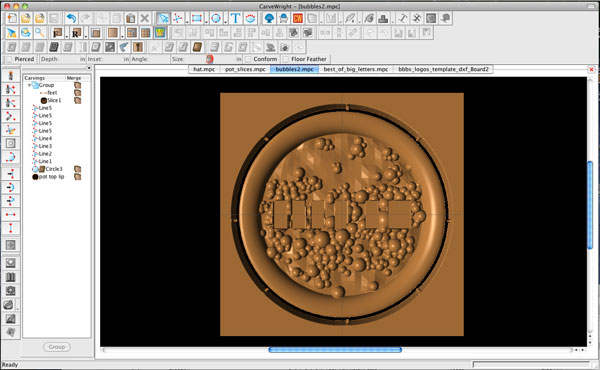
The bubbles were already flat, so I only sliced them to make the pattern shallower.

Since I already had the letters in Pattern Sculptor, I was able to adjust their depth to fit a 3/4″ board in 2 pieces. I could’ve sliced them as well, but it was just as easy to make those adjustments in Sculptor. The reason, I wanted to do them in 2 pieces that would be stacked and glued, was the small spaces in between the letters. The long bits, which are tapered, would give me a large difference in those spaces from the front to back. Once all these patterns were created, it was time to layout the Project Designer boards.
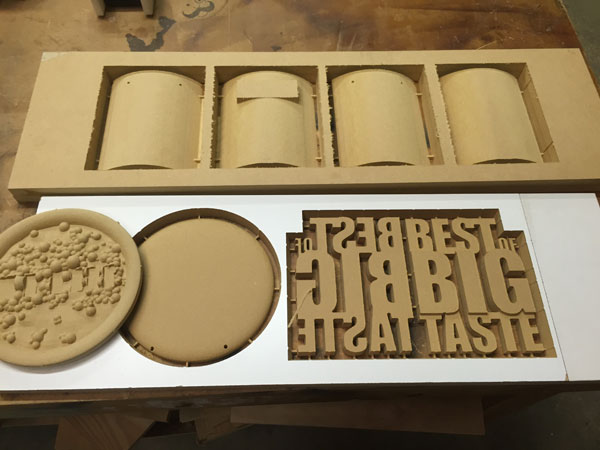
The pot sides were placed in a row, with pierced regions around them and tabs. I placed a 0 depth region on the center of the front slice for an engraved plate to be attached, and I positioned and placed small round regions to indicate where the pot handles will be attached.

Speaking of pot handles, I needed actual metal pot handles to hold up being carried and handled. I made a quick stop at my local Goodwill store and found an old pot with nice heave duty pot handles. I forgot to take photos of that process, but with some Dremel cutting wheels, I soon had those removed and ready to attach when I got to that point.
The next layout was the chef hat. When I had imported it into the STL Importer, I positioned it and exported it into Project Designer PRO. In Designer PRO, I created a region that, basically, set a .5″ rod through the center of turned piece as a kind of tab.

I positioned the front and back of the letters next to each other and the bottom of the pot on the same board.

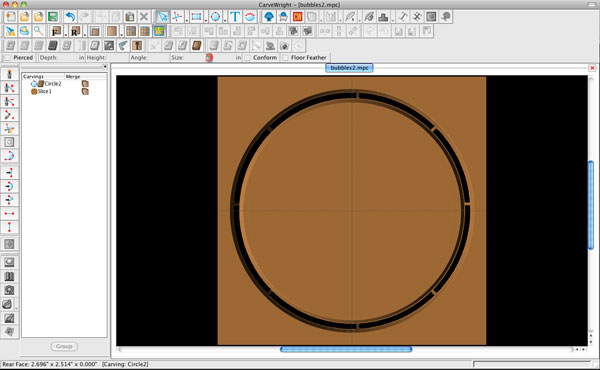
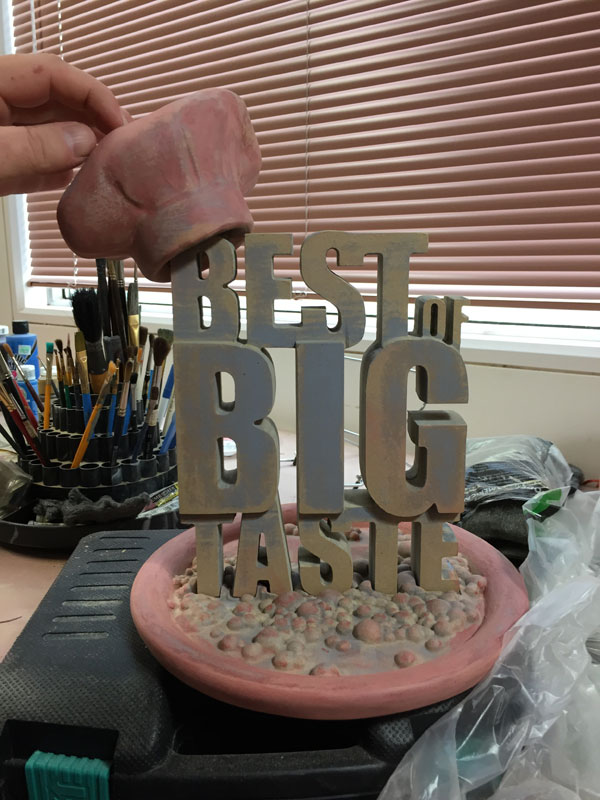
I set the bubbles up as its own project, since it needed to be 2 sided. I, also, created recessed regions where the base of the letters will sit. This will give a better effect of the letters rising out of whatever is cooking in the pot.
All my files are prepared, so off to the CarveWright machine for carving.
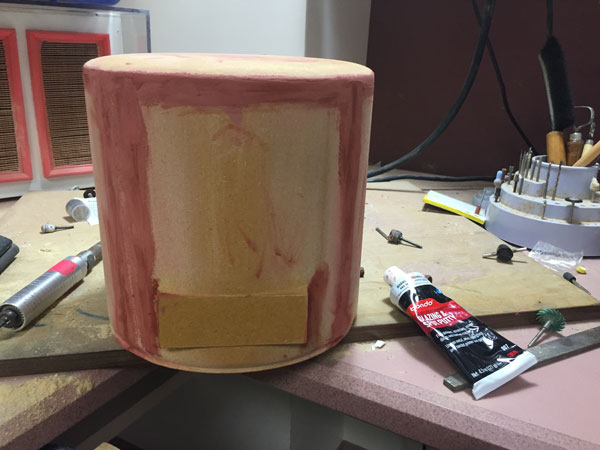
First, I need to prep the material. I built all of this out of MDF for it’s consistency. It’s so much easier to fill and sand MDF smooth without all that pesky wood grain. For the pot pieces, I was using the 1/8″ Long Carving Bit and needed a board 1.5″ thick, so I glued two .75″ thick boards together.
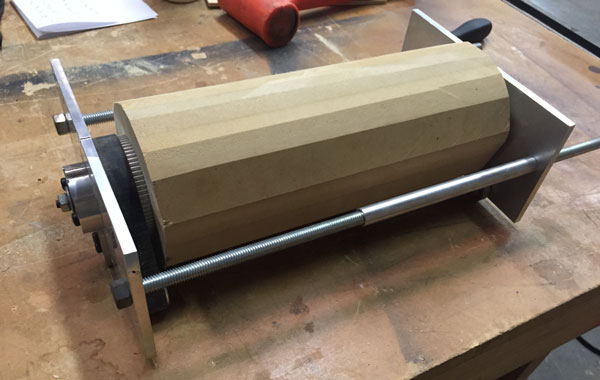
Next, was preparing a block for the rotary carve. It needs to be 4.25″ in diameter, so this was a pretty thick stack.
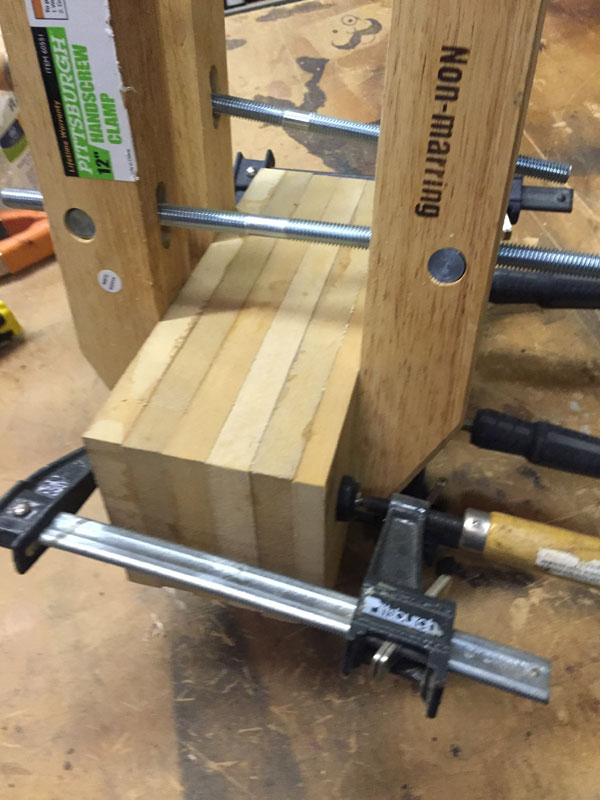
The CarveWright Rotary Jig can handle a maximum of 4.25″ diameter piece, so I needed to round this off as best I could. I took it to the table saw, set the blade to 45º, and took the corners off. Then I set the blade to 30º and took more corners off. The end result was a faceted, but pretty round piece of stock. It was round enough to allow clearance in the machine anyway, which is all I needed. This carve also used the 1/8″ Long Carving Bit.
The other 2 boards, were very simple, since they were on .75″ thick and used the standard 1/16″ Carving Bit. I simply cut them to size and loaded them into the machines. I used 2 machines to speed up the process, and had everything carved in a day. (Don’t you want a second machine now? 🙂 )
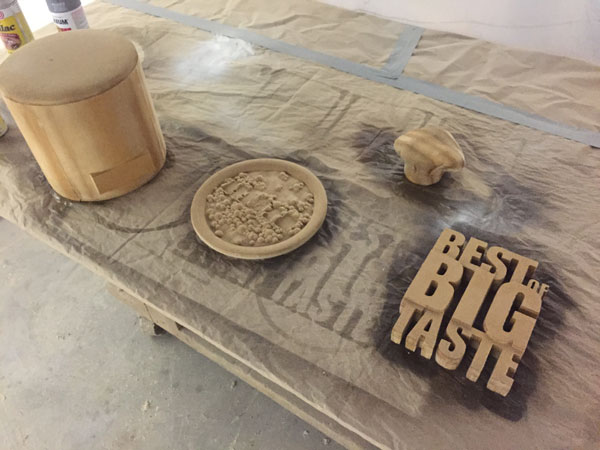
Ok, the pieces are finished and all came out perfect.
The first thing I do ,when working with MDF, is to get some sealer on them immediately. I like to use clear spray on Shellac. It dries quick and crystallizes all the fuzzies, so they just break off when you take it to the sanding mops.
Once, Ive got them sealed and I’ve done a bit of sanding with the Double 240 Grit Sanding Mop, I’ll remove the tabs and start the assembly.
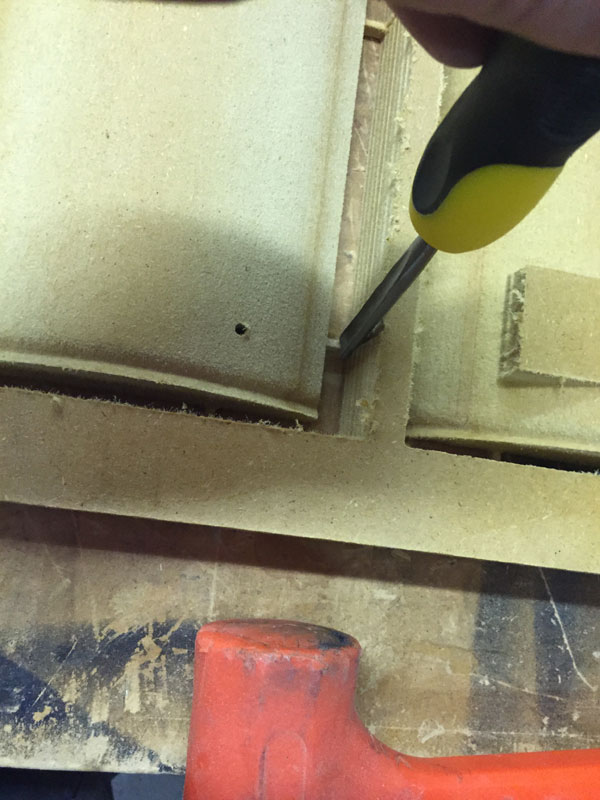
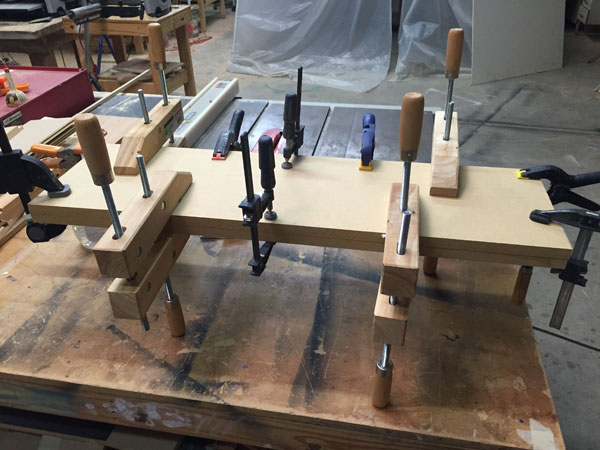
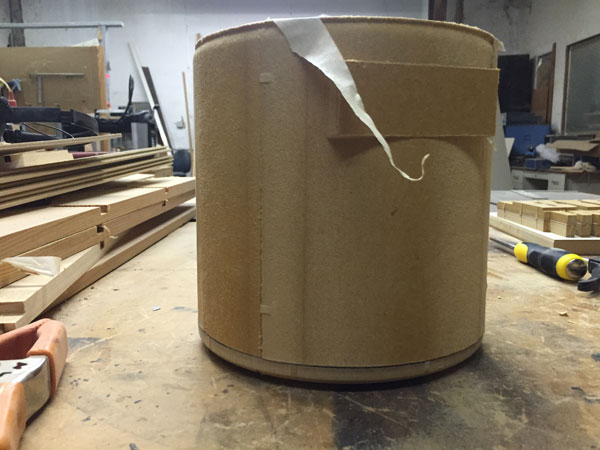
I started with the pot. After doing a dry fit to make sure everything fit together properly, I cut blocks and screwed them in to create larger areas to glue to, and if needed, I could toenail a screw in for extra support. Turns out I didn’t need to. The fit was nice and tight.
Next, I proceeded to glue it all together.
With it all glued, everything got another 2-3 coats of Shellac, followed by more sanding with the mops.
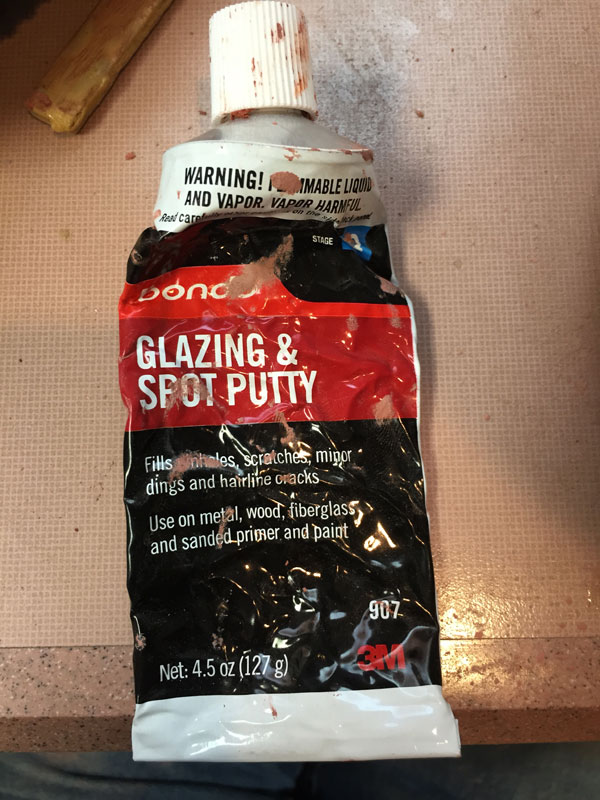
Now the work begins. Filling and sanding, filling and sanding, and filling and sanding some more. I have another secret weapon that actually makes all of this go pretty fast. I’ve used just about every filler product on the market, but none of them are as magical as this stuff; Bondo Glazing and Spot Putty. It’s easy to work with, dries fast, sands perfectly smooth, and gets hard. I usually find it in auto parts stores.
When you feel like you’ve got everything filled, spray it with primer to find out you were wrong.

Then, sand and fill some more. It sounds like a lot of work, but with the right materials, you see amazing results really fast, which fuels an obsession of smoothness.
Remember those pot handles I mentioned earlier, well they were getting some treatment during this process as well, and again, I forgot to take photos. The handles were chrome, which poses a problem when trying to paint them. At the same auto parts store where I buy my Bondo glazing putty, I found some etching primer for prepping surfaces like this. It has an acid in it that helps etch the surface enough for the paint to bond. I scuffed it up pretty good with sandpaper first and then sprayed away. I bought stainless steel screws to attach them to the pot, so they got the same treatment.
Next, it’s time to start attaching these pieces together. The chef hat is positioned, marked and then attached with a dowel.

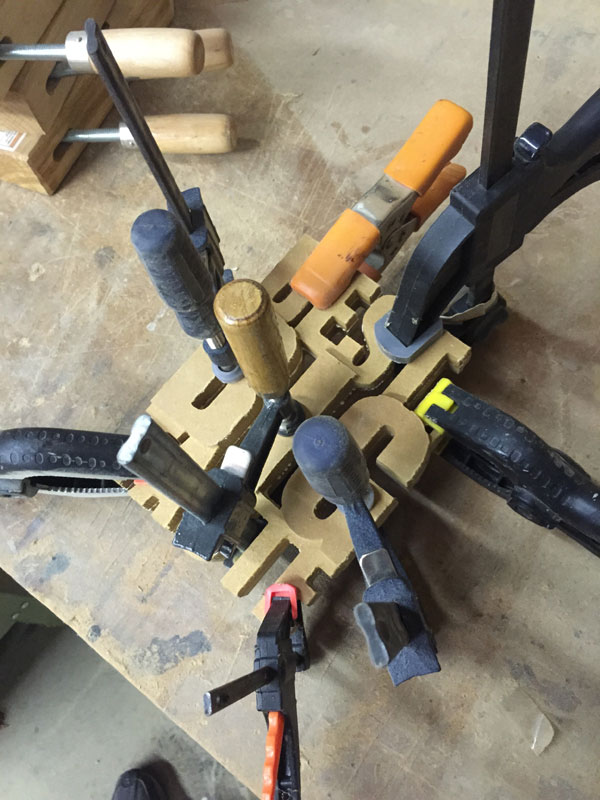
Then the letters were screwed onto the base from the bottom. I drilled pilot holes and put 2″ screws in to give it a very stable anchor. Now, I’m starting to see how this is all going to look together.
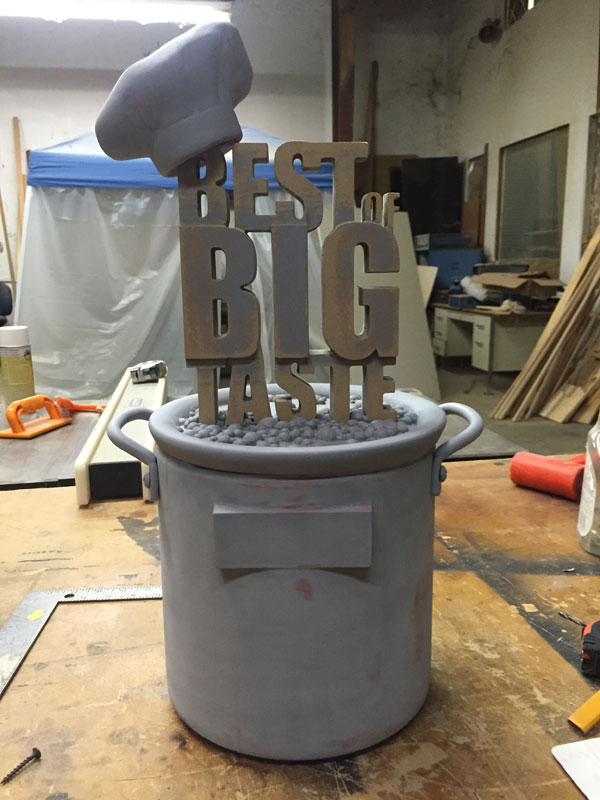
The top needs to be attached to the base next. This was done with glue and clamps, then it was on to more filling.
Alright, this thing is fully assembled and it’s as smooth as I can get it. I think it’s time to paint it. It’s a trophy, so we had decided, from the beginning, to put a metallic finish on it. We chose the Bronze C Metal Coating from Sculpt Nouveau. I’ve worked with this stuff before and love it. With multiple coats, this stuff gets thick enough and hard enough to polish like real metal, and the various patina’s available for it are amazing. This is an excellent product.
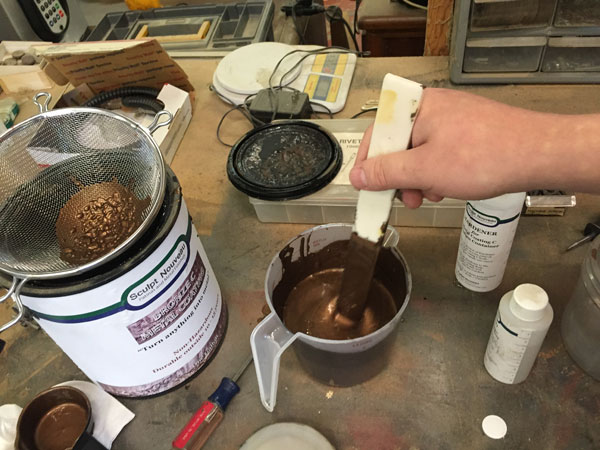
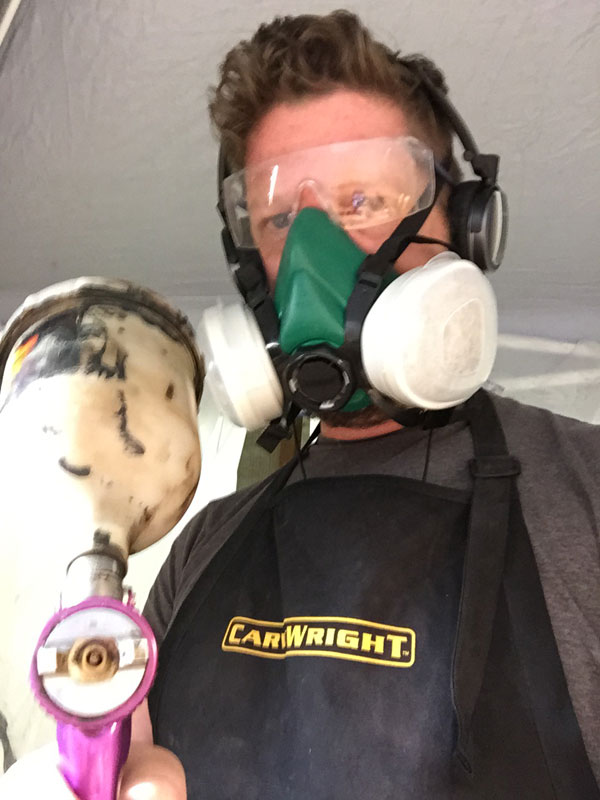
I followed the instructions for mixing and prepared my HPLV spray gun to go do some painting.
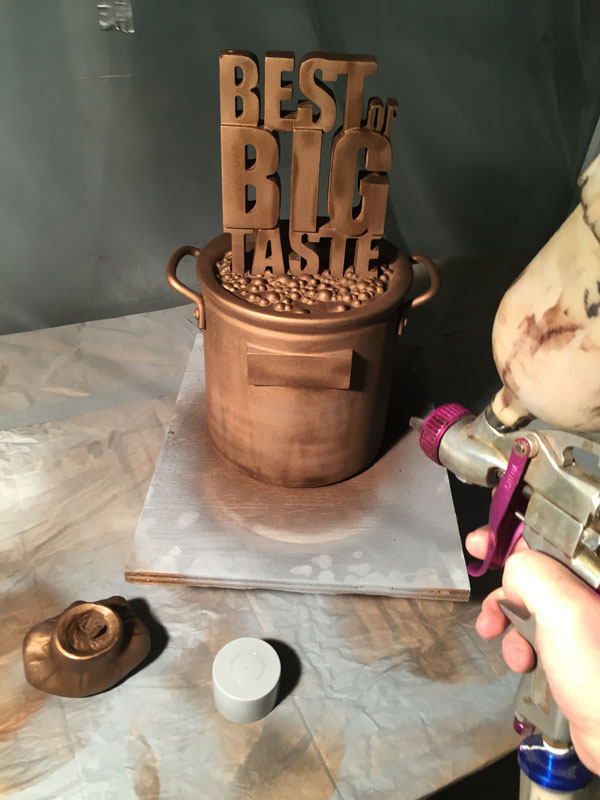
I like to do about 3-4 coats, then do some light sanding, and repeat. After about 12 coats, I was feeling like I might be almost done, so I did several more.
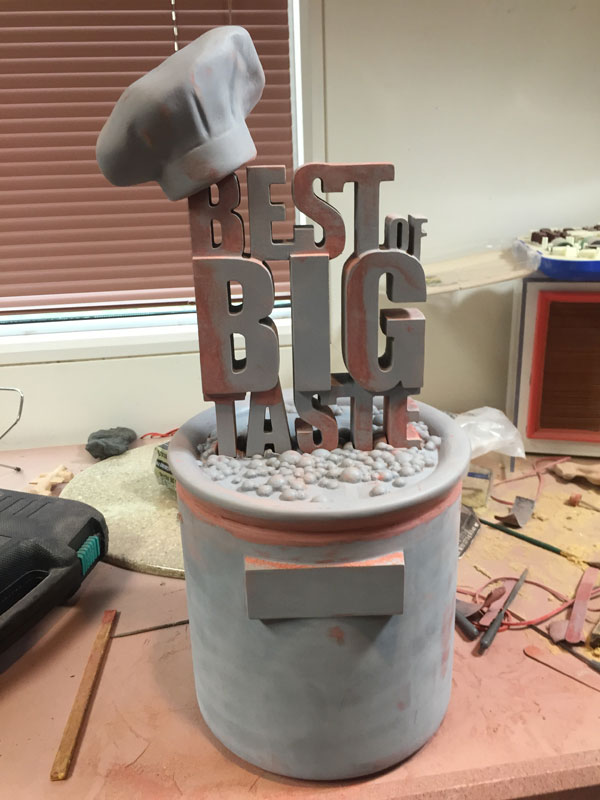
Next step is patina. For this project, Bridgette, who has a lot of experience working with real bronze sculptures, asked about tinting some areas with slightly different colors. Like the letters, we want a little more yellow. I have some tricks for doing this, but the first step was to age it a bit.
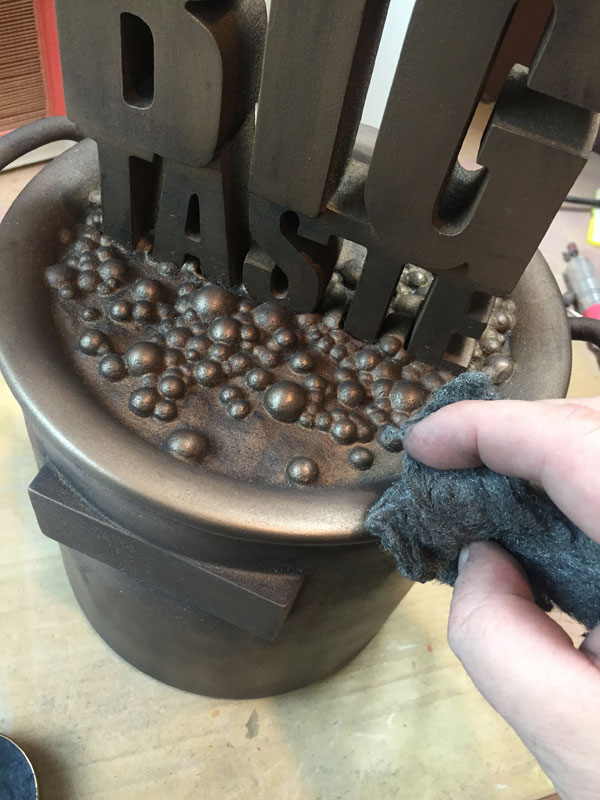
To age it, there are many techniques you can use, including special chemicals that will react with the metal. For this, we just wanted to blacken it a bit in the crevices and then polish it back to get a nice polished shine on the higher areas. I did this with black shoe polish.
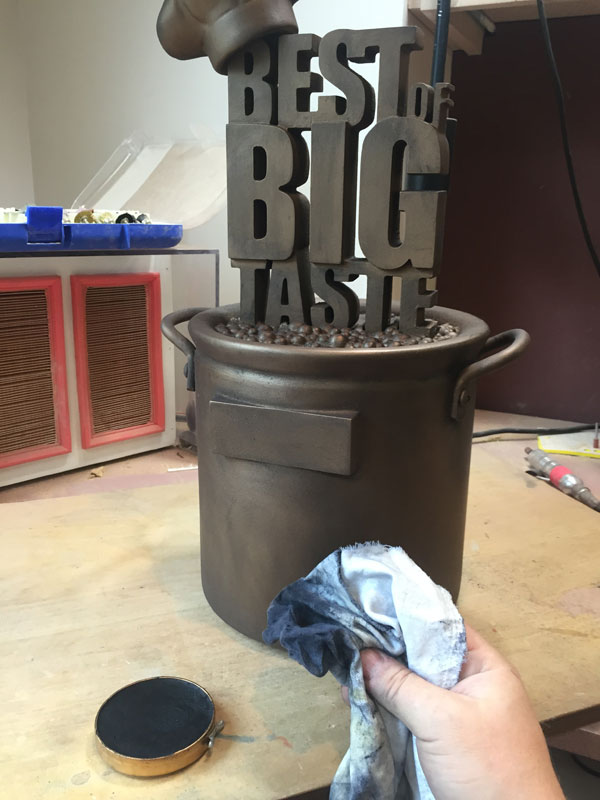
Once the shoe polish is rubbed in good all over, it’s time to do some real polishing. I use 0000 steel wool for this. The metal C coating is thick and hard from curing for a couple days, so we can work it pretty good. You don’t want to get overly aggressive, but you want to create a nice shine.
Once polished up, do any touch-up that may be needed and it’s ready for the next step.
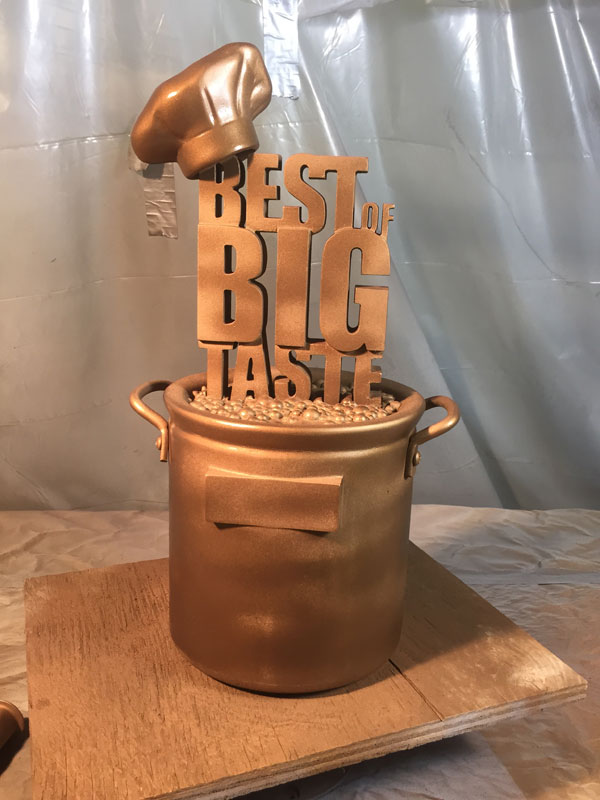
I purchased some metallic waxes at some point, and decided to use these for the coloring. They vary in color, from a red copper like tone, to a yellow brass. These are easy to use. You simply spread it on with your finger. I applied some yellow tones to the letters, rubbing it in good to spread it around We want to blend it in rather than paint it on.
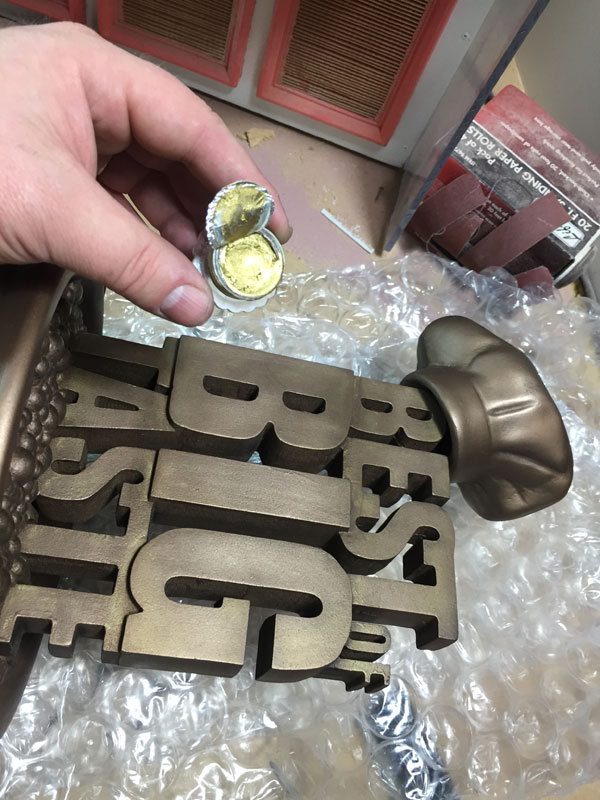
These dry pretty much instantly, so after they were applied, I immediately polished it back some more with the steel wool. It blends rather nicely and reproduces the type of patinas you can get at an actual foundry. This is pretty much done at this point. Lastly, after I turn it over to Bridgette, she will attached the name plate to the front and glue a felt pad to the bottom, and it’ll be ready for showtime.
Here are several shots of the finished piece, and I’ll take some more at the event on May 17th.